


How to Attach a Terrace Roof to a Rafter: A Simple Guide
Dreaming of a shaded oasis in your backyard? A terrace roof is an excellent way to extend your living space, provide protection from the elements, and enhance the aesthetic appeal of your home. However, the construction process can seem daunting. This guide will break down the process of attaching a terrace roof to a rafter, making it accessible for DIY enthusiasts of varying skill levels. We’ll focus on clarity, safety, and delivering a durable result.
Understanding the Basics: What You’ll Need
Before you start hammering away, it’s crucial to gather the right tools and materials. This preparation will streamline the process and ensure a safe and successful outcome.
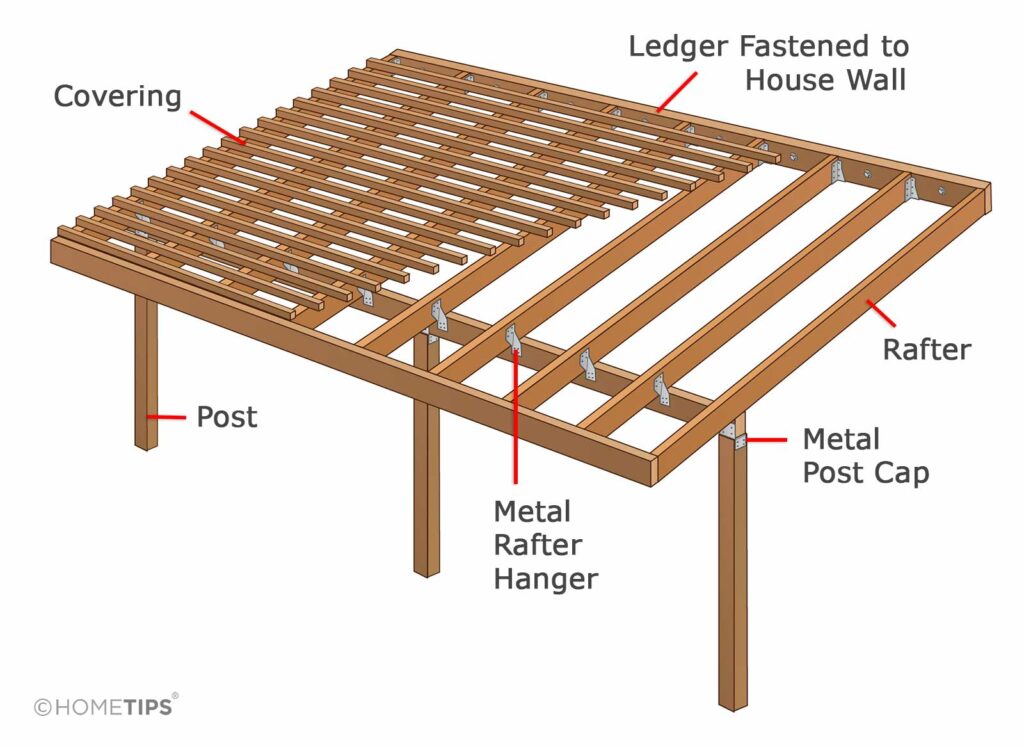
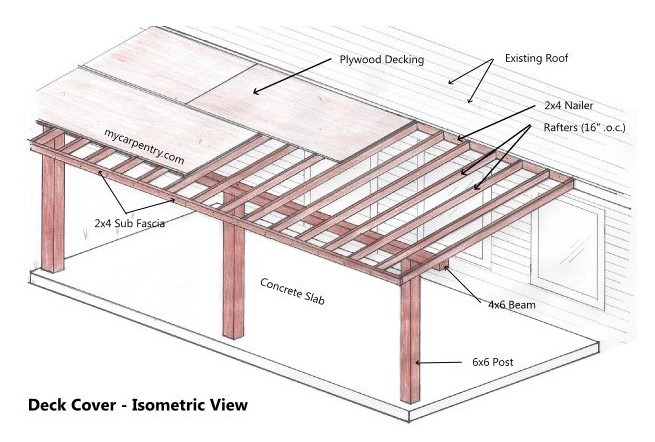
- Rafters: These are the structural beams that will support your roof. Ensure they are properly sized and spaced according to your local building codes and the weight of your chosen roofing material.
- Roofing Material: Choose a material that suits your climate and aesthetic preferences. Common options include:
- Wood (cedar, redwood, pressure-treated pine)
- Metal (aluminum, steel)
- Polycarbonate
- Fabric (for shade structures)
- Fasteners: Screws are generally preferred over nails for their superior holding power. Consider using:
- Exterior-grade screws (stainless steel or coated) to resist corrosion.
- Screws of appropriate length for your rafter and roofing material thickness.
- Tools:
- Measuring tape
- Level
- Circular saw or hand saw
- Drill/driver with appropriate bits
- Safety glasses
- Work gloves
- Stud finder (to locate existing studs if attaching to a house)
- Ladder (or scaffolding)
- Additional Materials (depending on the design):
- Flashing (to prevent water intrusion, especially where the roof meets a wall)
- Sealant/caulk (for weatherproofing)
Step-by-Step Guide: Attaching Your Terrace Roof
This section provides a general overview. Always consult local building codes and manufacturer instructions for specific guidance.
Planning and Preparation:
- Design: Determine the size, shape, and pitch of your terrace roof. Consider the location of your house and the amount of shade desired.
- Measurements: Accurately measure the dimensions of your rafter structure. Ensure that the rafters are properly spaced and supported.
- Permits: Check with your local building department to determine if permits are required.
Preparing the Rafters:
- Alignment: Ensure that the rafters are level and aligned. Use a level and string line to achieve this.
- Attachment Points: Determine the attachment points for your roofing material on the rafters. This will depend on the type of roofing you’ve chosen.
Attaching the Roofing Material to the Rafters:
- Positioning: Carefully position the first sheet or piece of your roofing material onto the rafters.
- Securing: Use the appropriate screws to secure the roofing material to the rafters. Follow the manufacturer’s recommendations for screw spacing and placement.
- Overlapping (if applicable): If your roofing material requires overlapping, ensure that it is done correctly to prevent leaks.
- Cutting (if necessary): Use a circular saw or hand saw to cut your roofing material to fit around any obstructions or at the edges of the terrace.
Finishing Touches:
- Flashing Installation (if necessary): Install flashing around any areas where the roof meets a wall to prevent water intrusion.
- Sealing: Apply sealant or caulk to any gaps or joints to ensure a watertight seal.
- Inspection: Carefully inspect your work to ensure that all fasteners are secure, and all seams are properly sealed.
Safety First: Essential Precautions
Working at heights and with power tools can be dangerous. Always prioritize safety:
- Wear safety glasses and work gloves.
- Use a stable ladder or scaffolding.
- Never work alone. Have a spotter if possible.
- Disconnect power tools when not in use.
- Be aware of overhead power lines.
- Follow all manufacturer’s safety instructions.
Maintaining Your Terrace Roof
Regular maintenance will extend the lifespan of your terrace roof.
- Inspect Regularly: Check for any loose fasteners, damaged roofing material, or signs of leaks.
- Clean Debris: Remove leaves, branches, and other debris from the roof to prevent water buildup.
- Re-seal as Needed: Re-apply sealant or caulk as needed to maintain a watertight seal.
- Repaint or Re-stain: For wooden roofs, repaint or re-stain periodically to protect the wood from the elements.
Frequently Asked Questions (FAQs)
What is the best type of roofing material for a terrace roof? The best material depends on your budget, climate, and aesthetic preferences. Consider wood, metal, polycarbonate, or fabric. Research the pros and cons of each material to make an informed decision.
How far apart should rafters be spaced? Rafter spacing depends on the weight of your roofing material and local building codes. Consult with a building professional or review your local codes for specific recommendations.
Do I need a permit to build a terrace roof? This depends on your local regulations. Check with your local building department to determine permit requirements. Often, structures of a certain size will require a permit.
How long will it take to build a terrace roof? The construction time varies depending on the size and complexity of the roof and your experience level. A small, simple roof might take a few days, while a larger, more complex project could take longer.
Can I attach a terrace roof to an existing building? Yes, you can. However, you’ll need to ensure that the existing structure is strong enough to support the additional weight. Consult with a professional if you are unsure.
Conclusion
Attaching a terrace roof to a rafter is a rewarding project that can significantly enhance your outdoor living space. By following this guide, taking the necessary safety precautions, and paying attention to detail, you can create a beautiful and functional terrace roof that you can enjoy for years to come. Remember to consult local building codes and, if needed, seek professional advice to ensure a safe and successful outcome. Happy building!
