


The MTB Rear Mudguard Template You’ve Been Waiting For: Optimize Your Ride
Mountain biking is a thrilling sport, but it comes with a dirty secret: mud. Kicking up from your rear tire, mud, water, and debris can quickly ruin a ride, leaving you soaked, splattered, and potentially damaging your bike. Thankfully, the humble rear mudguard offers a simple yet effective solution. But finding the perfect fit and design can be a challenge. This article dives into the world of MTB rear mudguards, offering insights and ultimately, the template you need to protect your ride.
Why You Need a Rear Mudguard for Your MTB
Before we get to the template, let’s clarify why a rear mudguard is a crucial addition to your mountain bike:
- Keeps You Cleaner: Perhaps the most obvious benefit. A rear mudguard significantly reduces the amount of mud, water, and grime that splatters up your back and onto your riding gear.
- Protects Your Bike: Debris kicked up by your rear tire can damage your rear shock, suspension linkages, and other critical components. A mudguard acts as a barrier, prolonging the lifespan of your bike parts.
- Improves Visibility: Mud and water on your glasses or goggles can severely impair your vision. A rear mudguard helps keep your vision clear, enhancing your safety on the trails.
- Enhances Comfort: Riding in wet or muddy conditions can quickly become uncomfortable. A mudguard helps keep you dryer and warmer, allowing you to focus on the trail ahead.
Understanding the Different Types of MTB Rear Mudguards
There are several types of rear mudguards available, each with its own pros and cons:
- Seatpost-Mounted Mudguards: These are typically quick and easy to install, attaching directly to your seatpost. They offer decent protection but might not be ideal for aggressive riding.
- Frame-Mounted Mudguards: These mudguards attach to the frame, often using existing mounting points. They offer more comprehensive protection and are often more robust.
- Clip-On Mudguards: These mudguards are designed to clip onto the seat stays or other parts of the frame. They are generally lightweight and easy to install and remove.
- Full Suspension Mudguards: Specifically designed for full-suspension bikes, these mudguards often integrate with the rear triangle for maximum protection of the shock and suspension components.
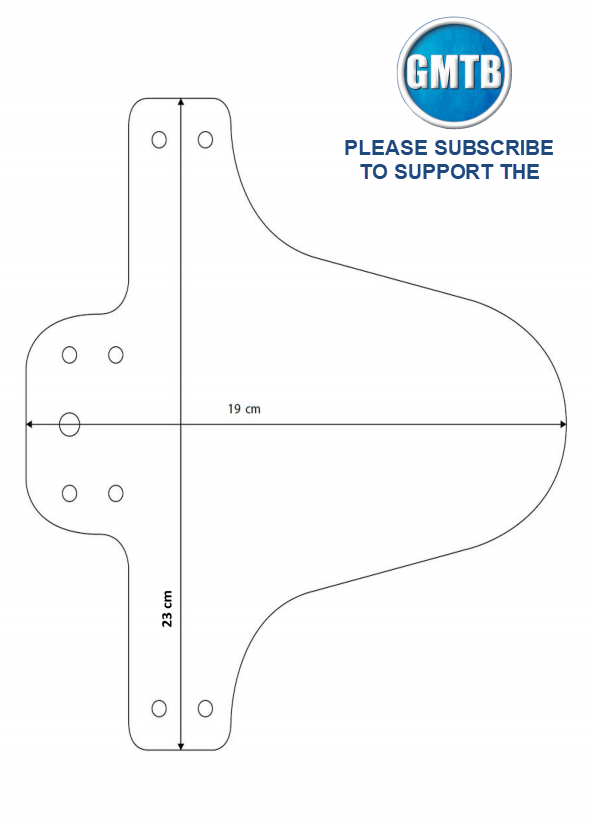
Introducing the Essential MTB Rear Mudguard Template
Finding a mudguard that perfectly fits your bike can be a hassle. Therefore, we’re providing a template you can adapt to your specific needs. This template is designed to be printed, cut, and used as a guide to create your own custom rear mudguard from readily available materials.
What You’ll Need:
- The Template (Download Link Below) – This is the core of the project!
- Durable Material: We recommend using a flexible, impact-resistant plastic like polypropylene sheet (often available at hardware stores). Consider using a recycled plastic source.
- Scissors or a Craft Knife: For cutting the template and the material.
- Drill (Optional): For creating mounting holes.
- Zip Ties or Straps: For securing the mudguard to your bike.
- Marker: For tracing the template onto your chosen material.
Download the MTB Rear Mudguard Template:
[Insert download link here - e.g., “Download the MTB Rear Mudguard Template (PDF)” or a link to a website offering the template]
Instructions for Using the Template:
- Print the Template: Print the template at 100% scale.
- Trace the Template: Place the template on your chosen plastic sheet and trace the outline carefully.
- Cut Out the Mudguard: Use scissors or a craft knife to cut along the traced lines.
- Determine Mounting Points: Hold the cut-out mudguard against your bike and mark where you need to drill holes for zip ties or straps.
- Drill Mounting Holes (Optional): Use a drill to create the holes at the marked locations.
- Mount the Mudguard: Secure the mudguard to your bike using zip ties or straps, ensuring a snug fit.
- Test and Adjust: Ride your bike and adjust the mudguard’s position as needed for optimal protection.
Customizing Your Mudguard for Optimal Performance
This template is a starting point. Here are some tips for customizing your mudguard:
- Length: Adjust the length of the mudguard based on your riding style and the amount of protection you need. Longer mudguards offer better protection but can be more prone to catching on obstacles.
- Width: Ensure the mudguard is wide enough to cover the width of your rear tire.
- Shape: Experiment with the shape of the mudguard to enhance its effectiveness. Consider adding a flared edge for increased coverage.
- Material Thickness: Choose a material thickness that balances durability with flexibility. Too thin, and it might break; too thick, and it might be difficult to mount.
Maintaining Your MTB Rear Mudguard
Once installed, your mudguard requires minimal maintenance:
- Regular Cleaning: Wipe down your mudguard after each ride to remove mud and debris.
- Inspection: Check for any cracks or damage, and replace the mudguard if necessary.
- Tightening: Ensure the zip ties or straps are securely fastened to prevent the mudguard from shifting during rides.
Conclusion: Ride Cleaner, Ride Longer
A well-designed rear mudguard is a crucial piece of equipment for any serious mountain biker. By utilizing our provided template and following the customization tips, you can create a reliable and effective mudguard that will keep you and your bike cleaner, and your rides more enjoyable. Download the template, get creative, and start enjoying drier, more comfortable rides!
FAQs: Your Questions Answered
1. What material is best for making a rear mudguard?
Durable, flexible, and impact-resistant plastic like polypropylene sheet is an excellent choice. Recycled plastic options are also a sustainable alternative.
2. How do I attach the mudguard to my bike?
The most common method is to use zip ties or straps, threading them through holes in the mudguard and around the seat stays or other frame components.
3. Will this template fit all mountain bikes?
The template provides a starting point. You may need to adjust the size and shape to fit your specific bike frame and tire size. Experimentation is key!
4. Can I use this template for a front mudguard?
While the template is designed for the rear, you can adapt the design for a front mudguard, considering the different mounting requirements.
5. How do I prevent the mudguard from rattling?
Ensure the mudguard is securely attached with tight zip ties or straps. Consider adding rubber bumpers or foam padding between the mudguard and the frame to absorb vibrations.
